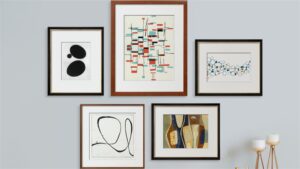
Creating the perfect gallery wall is an art form, but with a few simple steps, you can easily create a beautiful and unique display. Whether you’re a professional interior designer or just an amateur artist, arranging wall art can be both fun and rewarding.
Here’s a step-by-step guide to help you arrange two pictures in the perfect gallery wall.
Step 1: Choose Your Pictures
Before you start to arrange your wall art, it’s important to choose the right paintings. Think about the overall look and feel that you want your gallery wall to have — do you want it to be playful and whimsical? Sophisticated and elegant? Or something else entirely? Consider the size of your space when selecting pieces — if there’s not enough room for larger pieces, opt for smaller ones that will still make an impact. Think about how each piece will fit together as well; try to find pieces that complement each other in terms of color and theme. Once you’ve chosen your two pictures, it’s time to move on to step two!
Step 2: Hang Your Pieces
Now that you have picked out your two pictures, it’s time to hang them up! Before doing so, measure out where each artwork should go – make sure there is enough space between them for them both to be seen clearly. If possible hang them at eye level so they are easy for everyone in the room to appreciate. You can use either nails or picture hooks depending on what type of walls you have – if using nails make sure they are secured tightly into the wall so they don’t become loose over time! Once all of this is done – take a step back and admire your work!
Step 3: Arrange Other Elements
Now that your two main pieces are hung up on the wall, it’s time to think about what other elements could bring everything together nicely. If there isn’t enough space between your main artwork then consider adding some additional elements like frames or photo collages – this will give more depth and interest without taking away from either artwork itself. Other accessories like plants or candles can also add a nice touch – experiment with different arrangements until you find one that works best for the overall look of your gallery wall.
Step 4: Final Touches
Once everything is arranged on your gallery wall it’s now time for some final touches! Add small items like picture frames or textured objects around each artwork piece – this will create more visual interest without taking away from either artwork itself. You may also want to consider adding lighting fixtures above or around each piece of art as well – this will bring out all its unique details even more so when viewed from afar!
Arranging Wall Art doesn’t have to be difficult; with these few simple steps anyone can create their own perfect Gallery Wall with just two pictures! Remember – choose wisely when selecting pieces, hang up securely using appropriate tools such as nails or hooks, arrange other elements (such as frames) around each piece for added depth & interest and don’t forget about lighting fixtures & other accessories (such as plants & candles). With these tips in mind – creating beautiful Wall Art displays has never been easier!